What to Include on Your RSVP.studio Event Page
A clear RSVP page is the difference between smooth event planning and a flurry of follow-up messages. With RSVP.studio, you control which details guests see and which answers you collect, all from one shareable web link that works on any phone or computer. This guide shows exactly what to include on your event page—what’s essential, what’s optional, and the small wording tweaks that save time for you and your caterers or organisers. If you’re still setting up, you can create your RSVP.studio page here.
Celebrate your special day with RSVP.studio, featuring a romantic outdoor ceremony beneath a colourful floral arch and elegant guests
1) The essentials to publish first
These are the fields every event page should have. Keep them concise and consistent so guests can reply in seconds.
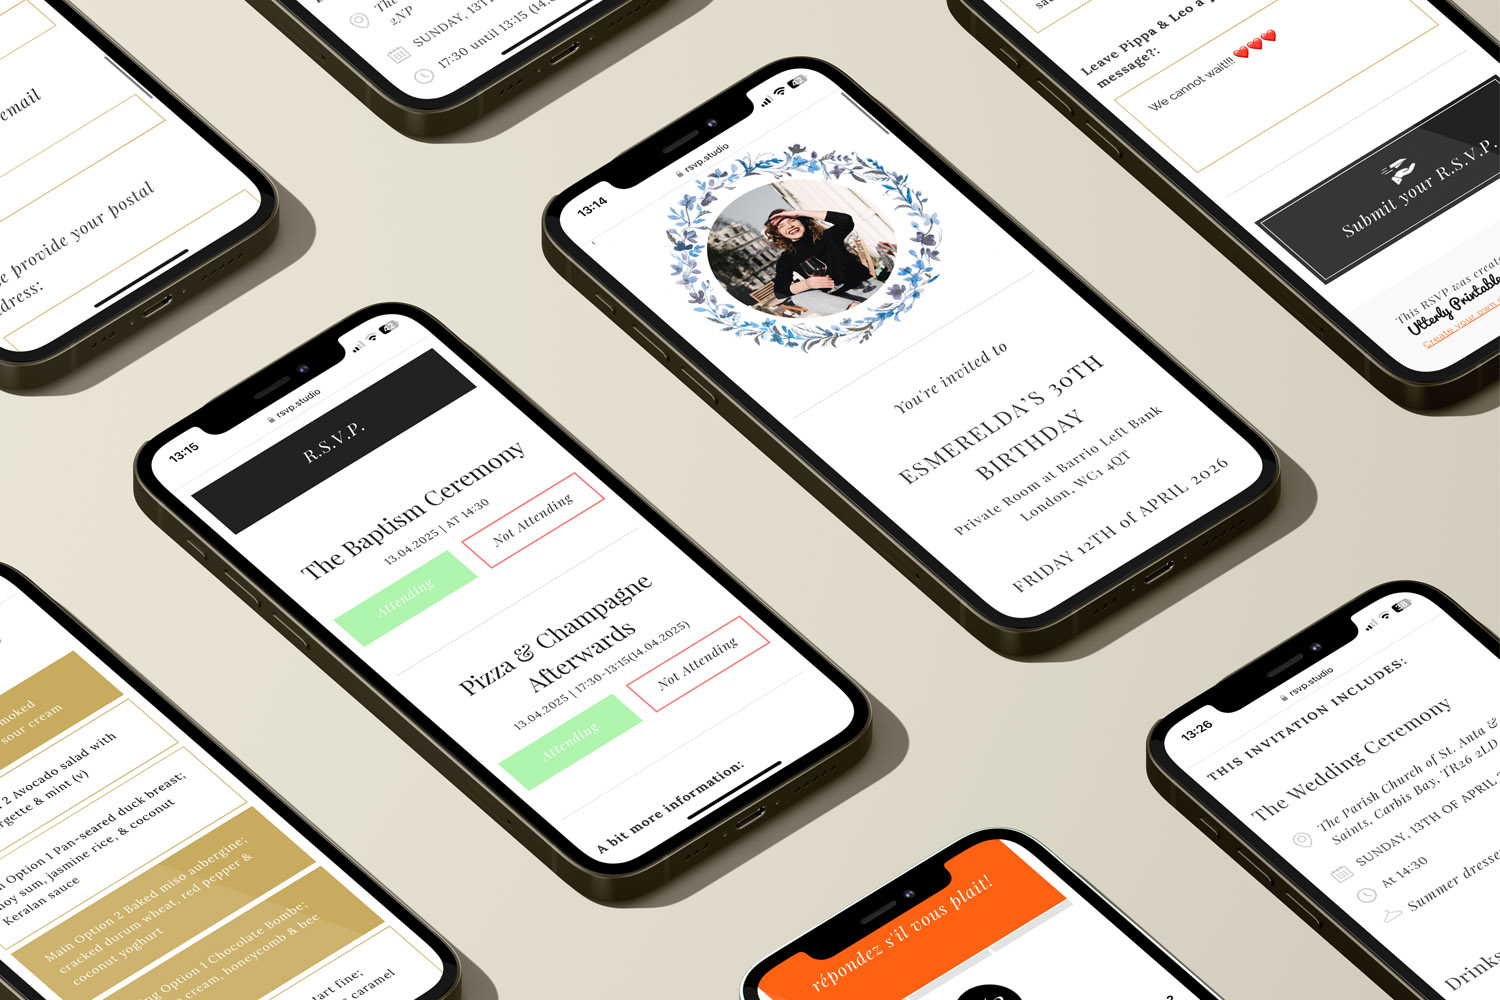
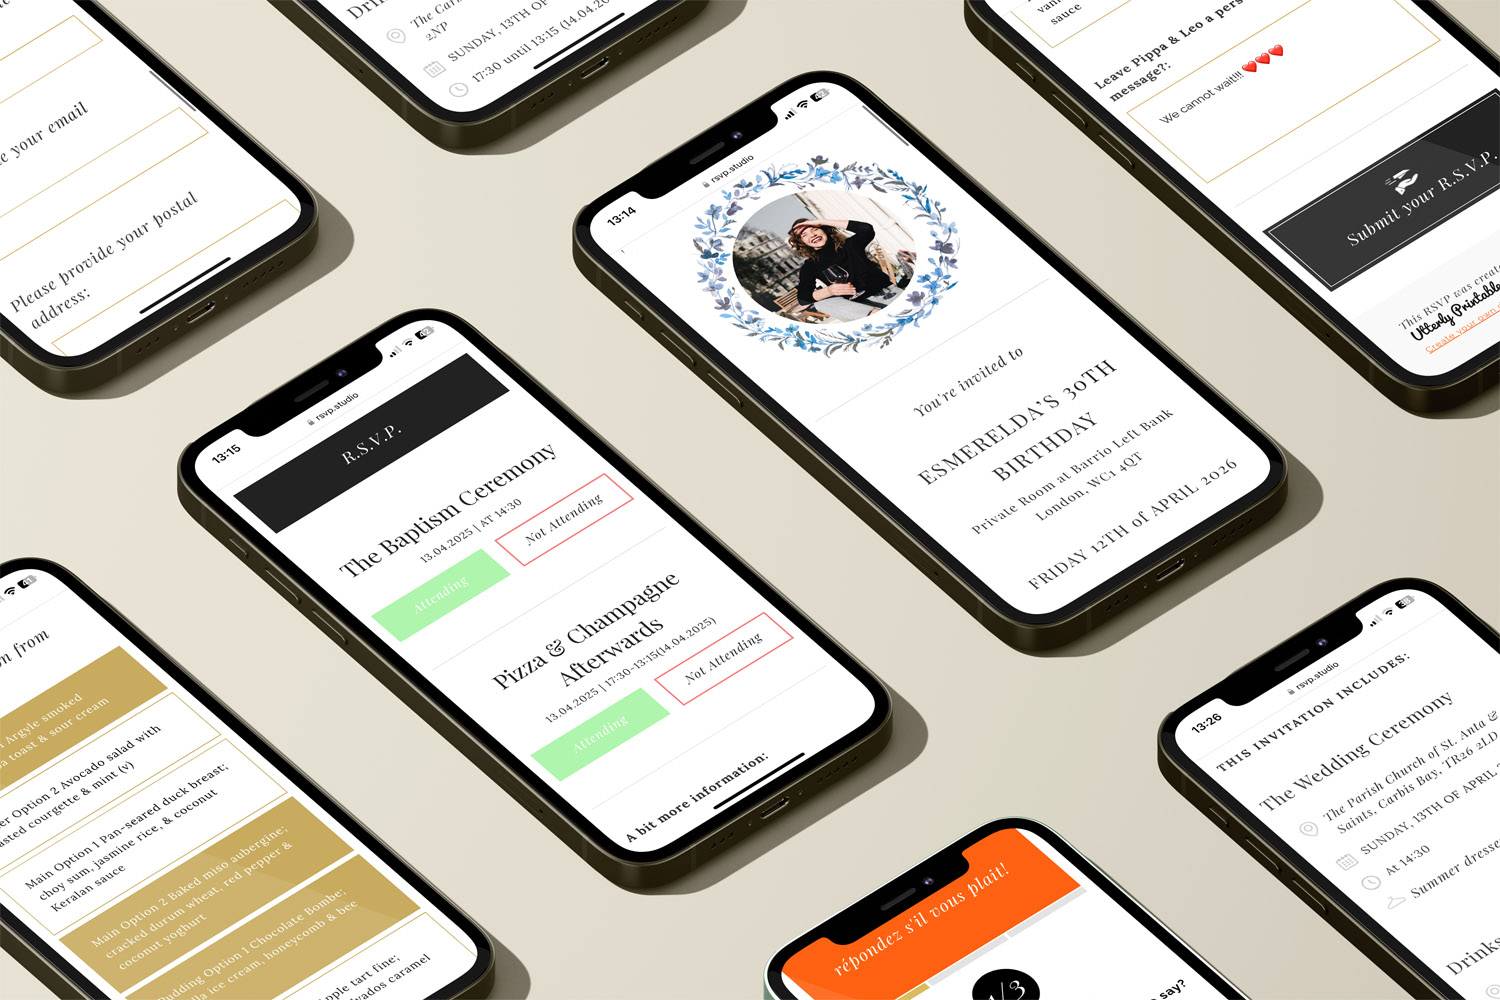
Event title & host names
Make the title unambiguous (“Sophie & Imran’s Wedding Reception” rather than “The Big Day”). Add host names if the event could be confused with another in your circle.
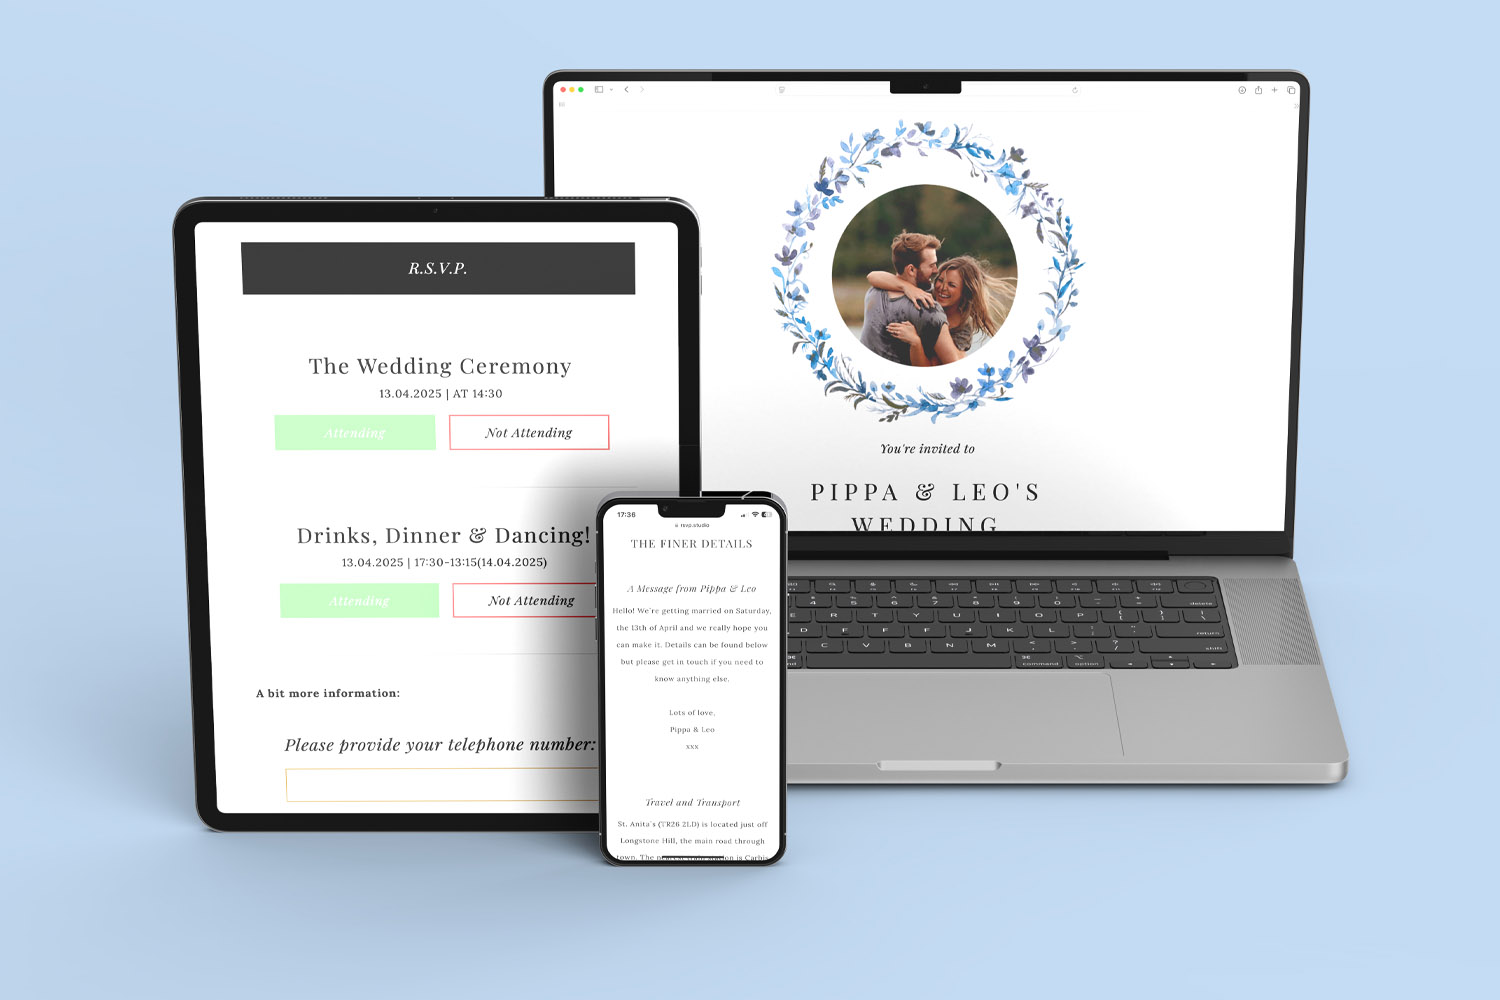
Date and time (start & finish)
Include both start and finish so guests can arrange childcare and transport. Use a clear format and spell out the day:
Saturday 6 September 2026, 2:00–11:00pm.
If you’re running multiple parts across the day (e.g., ceremony then evening), add sub-events later (see Section 3).
Venue address & map link
Enter the full postal address, including postcode, plus a map link. In RSVP.studio, use the location fields and paste a map URL so guests can launch directions instantly. If access is tricky, add a one-line note (“Parking behind the barn; use the farm gate”).
Dress code
Guests prefer short, specific guidance over poetic descriptions. Good examples: “Black tie optional”, “Summer garden party—wedges over stilettos”, “Smart casual”. Avoid ambiguous phrases like “dressy casual”.
RSVP deadline
State a firm date to keep your caterers happy. Phrase it as a friendly instruction near the top:
Please reply by Friday 9 August so we can confirm numbers and menu choices.
In RSVP.studio you can update the page later if your timeline shifts; the link continues to work.
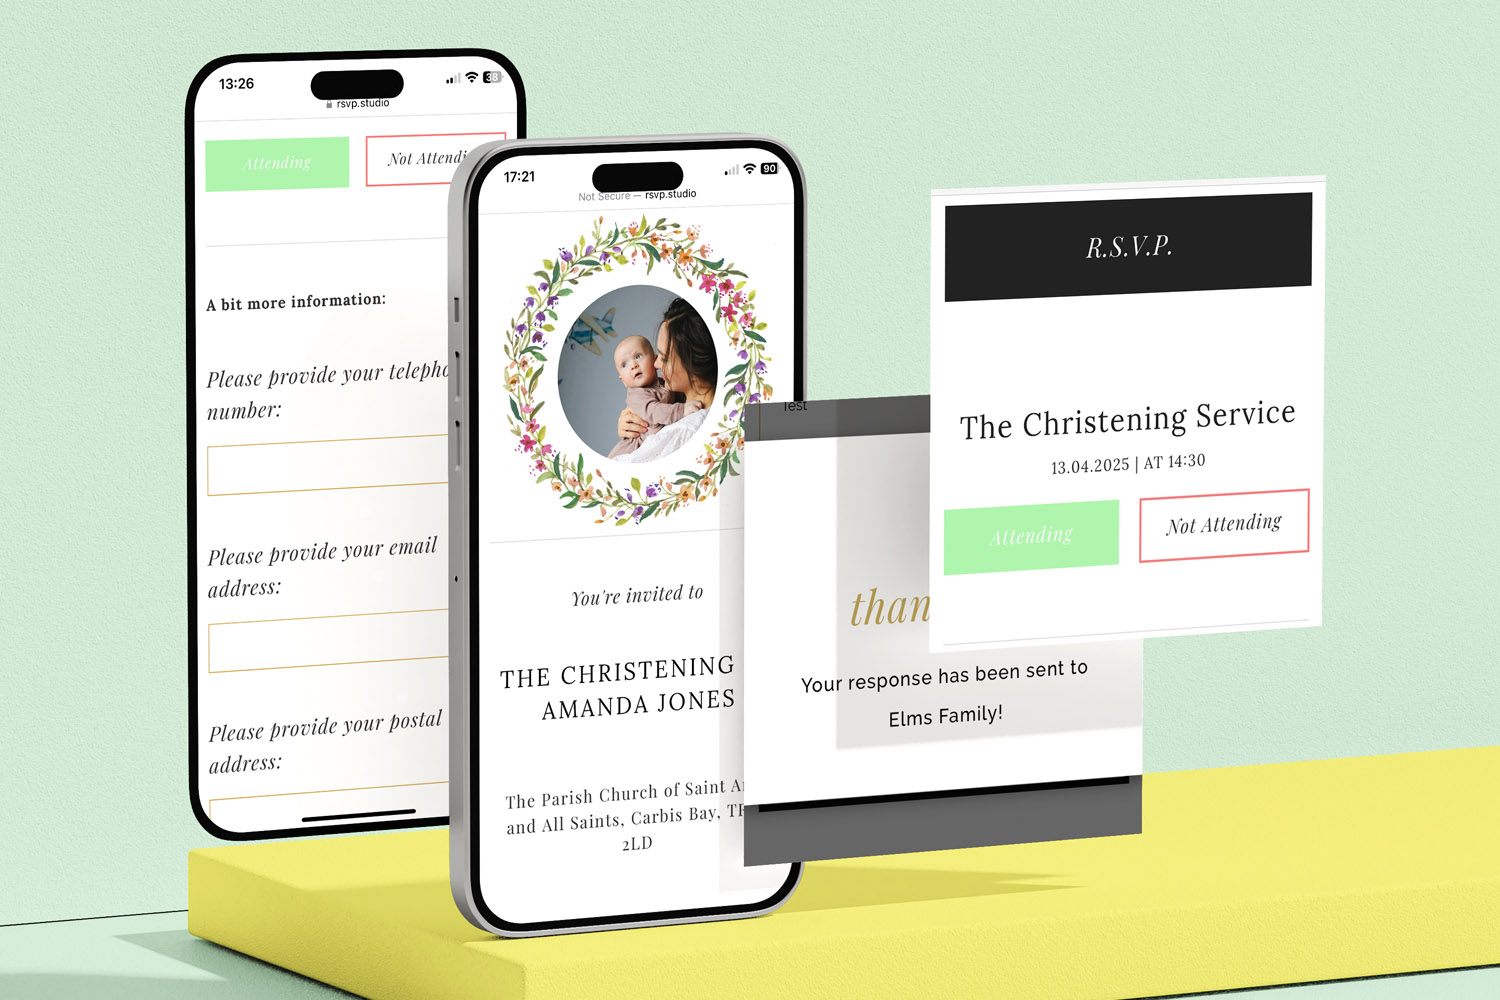
Primary contact
Include one point of contact (phone or email) for last-minute queries. Put it at the bottom of the page to keep the form focused.
Accessibility & travel notes (short)
One or two bullets are enough: step-free access, parking, shuttle details, taxi numbers, or a reminder about rural signal. If there’s a lot to say, summarise here and use the free-text area or a dedicated sub-event note for the rest.
A welcoming photo
RSVP.studio lets you upload photos and choose frames/themes. A single, high-contrast image (venue, couple, or logo) helps guests know they’re in the right place and makes the page memorable.
Tip: If you’re also sending printed stationery, add your personalised RSVP link or a QR code to the design. See our mobile-friendly options in digital stationery for smartphones, and pair with coordinating wedding invitation templates or early wedding save the date templates.

A vibrant RSVP.studio event drinks display with refreshing mojitos and spritz cocktails, perfect for welcoming your guests in style
2) Collecting accurate answers (without overloading guests)
Think about what you truly need to deliver the day. Keep required fields to the minimum, and prefer multiple-choice (radio buttons) where you need categorised data for catering or logistics.
Attendance
Use the standard “Will you attend?” question to capture Yes/No. If “No”, keep the rest of the form short—just offer an optional message box so people can send apologies or congratulations.
Plus-ones
Enable plus-one management and ask for a name if “Yes”. To reduce ambiguity, phrase it like this:
Are you bringing a guest? (Yes/No)
If yes, please tell us their full name as it should appear on the list.
This makes seating lists and badges easier later.
Children
If capacity is limited, be direct and kind:
We’re sorry we can’t accommodate children at the evening reception. Will you be bringing children to the daytime ceremony? (Yes/No)
If you welcome children, a simple count box (“Number of children attending”) plus a free-text note for highchairs or prams covers most needs.
Menu choices
Radio buttons are best for main options (e.g., Chicken / Fish / Vegetarian / Vegan). Add a separate free-text field for allergies or dietary requirements. Example wording:
Please select one main course per person (radio buttons)
Allergies we must know about (not preferences): (free text)
This keeps counts exact for your caterers while still capturing critical safety information.
Travel & transport
If you’re running coaches or shuttles, use multiple-choice with time slots, e.g., Coach from Station at 13:00 / 13:30 / Not required. A free-text question invites extra context such as bulky luggage or mobility needs.
Accommodation
You can include a short note with hotel suggestions and ask a light-touch question: Where are you staying? (Hotel A / Hotel B / Self-arranged). That can help with pick-up points.
Music requests
A single free-text box titled One song that will get you dancing keeps things fun without derailing the form.
Messages to the hosts
Keep this optional and at the end. It’s perfect for additional clarifications once all the structured data is captured.
When to use free-text vs. radio buttons
- Use radio buttons when you need a clean count (menus, coach seats, workshop selection).
- Use free-text for anything safety-critical or uncommon (allergies, accessibility notes, unusual arrival times).
- Avoid long checklists. If you need more than ~8 choices in any one area, consider splitting into sub-events or grouping choices (see next section).
Impress your guests with RSVP.studio event page catering, featuring delicious mini cheeseburgers served fresh on elegant plates.
3) Optional extras that reduce follow-up admin
Sub-events with their own details
For weddings and multi-day plans, activate sub-events (e.g., Rehearsal Dinner, Ceremony, Reception, Brunch). Each sub-event can hold its own date, time, and venue, and you can ask attendance questions per sub-event. This avoids confusion and gives you accurate head-counts for each part.
Map links & micro-directions
Besides the main venue map, add links for sub-event locations and any shuttle pick-up points. A single sentence like “pick-up opposite the station taxi rank” cuts down on the “Where exactly?” messages.
Password protection (optional)
If privacy matters, toggle password protection. Share the password in your invitations or directly with guests. This is useful for corporate events or private family occasions.
Pause or edit without fuss
If details change, you can update your RSVP page and even pause responses temporarily while you make edits. The existing link keeps working, so guests always see the latest information.
Plus-one & name capture
As soon as a guest selects “Yes” to a plus-one, prompt for the guest’s name. This prevents “+1” appearing on lists and helps with catering and place cards later.
Data handling for planners and caterers
All replies flow into your Utterly Printable account and can be downloaded as a spreadsheet (.csv). Because your key questions are multiple-choice, counts for menu choices, coach seats, or workshop signups are immediately clear—no manual tallying required.
Page presentation
Upload a small set of well-chosen photos and select a frame or colour theme that echoes your stationery. You don’t need a gallery; one or two images do the job and keep the page fast on mobile.
Before you hit publish
- Doublecheck the bespoke URL text; once set and paid for, it can’t be changed.
- Read your questions out loud. If any take more than a second to understand, simplify.
- Share the link with one trusted friend for a quick test on their phone.
- If you’re sharing via WhatsApp or SMS, keep your message short and put the link on its own line for easy tapping.
FAQs
Quick answers to common setup questions
Only ask what you genuinely need to run the event. As a rule of thumb, most guests can answer 5–8 short prompts in under a minute. Anything more and completion rates tend to fall. Use sub-events to split complex plans into bitesized steps.
Keep it binary and collect a name only if “Yes”: “Are you bringing a guest? (Yes/No). If yes, please tell us their full name.” This avoids half-complete answers and guesswork later.
Radio buttons for the main choice, every time. Add a separate free-text box for allergies or strict dietary requirements. That gives your caterers clean numbers and still captures safety-critical detail.
Yes—set up sub-events such as Ceremony, Reception, and Next-Day Brunch, each with its own time, venue, and attendance question. This keeps head-counts precise for each part.
If privacy is important, you can add a password and share it with guests in your invitations or message. It’s easy to toggle on or off later.
How to Create a Personalised RSVP.studio Link (Step-by-Step Guide)
Learn how to create a personalised RSVP.studio link for weddings, birthdays, or corporate events. This guide shows you how to customise your RSVP page, manage guest responses easily, and share your link-no spreadsheets needed.
Managing plus-one invitations with a digital RSVP
Discover how to manage plus-one invitations seamlessly with a digital RSVP using RSVP.studio. This guide covers practical tools, clear wording, and essential etiquette to help you keep your guest list accurate, organized, and stress-free for your celebration.
Sharing your RSVP.studio link: WhatsApp, SMS, email and printed invitations explained
Learn how to share your RSVP.studio link for event invitations via WhatsApp, SMS, email, and printed cards. This guide explains best practices, guest experience on devices, QR codes, and proper etiquette for sending or resending your RSVP link.
Using Sub-Events in RSVP.studio for Multi-Day or Multi-Part Celebrations
Discover how using sub-events in RSVP.studio streamlines planning for multi-day or multi-part celebrations, allowing you to manage separate RSVP replies, track attendance for each event segment, and keep all guest information organised in one convenient place.

From Our Blog
Online RSVP websites provide a streamlined solution for event planning. Visit the blog for insights into setting up RSVP pages for weddings, birthdays, and other celebrations.