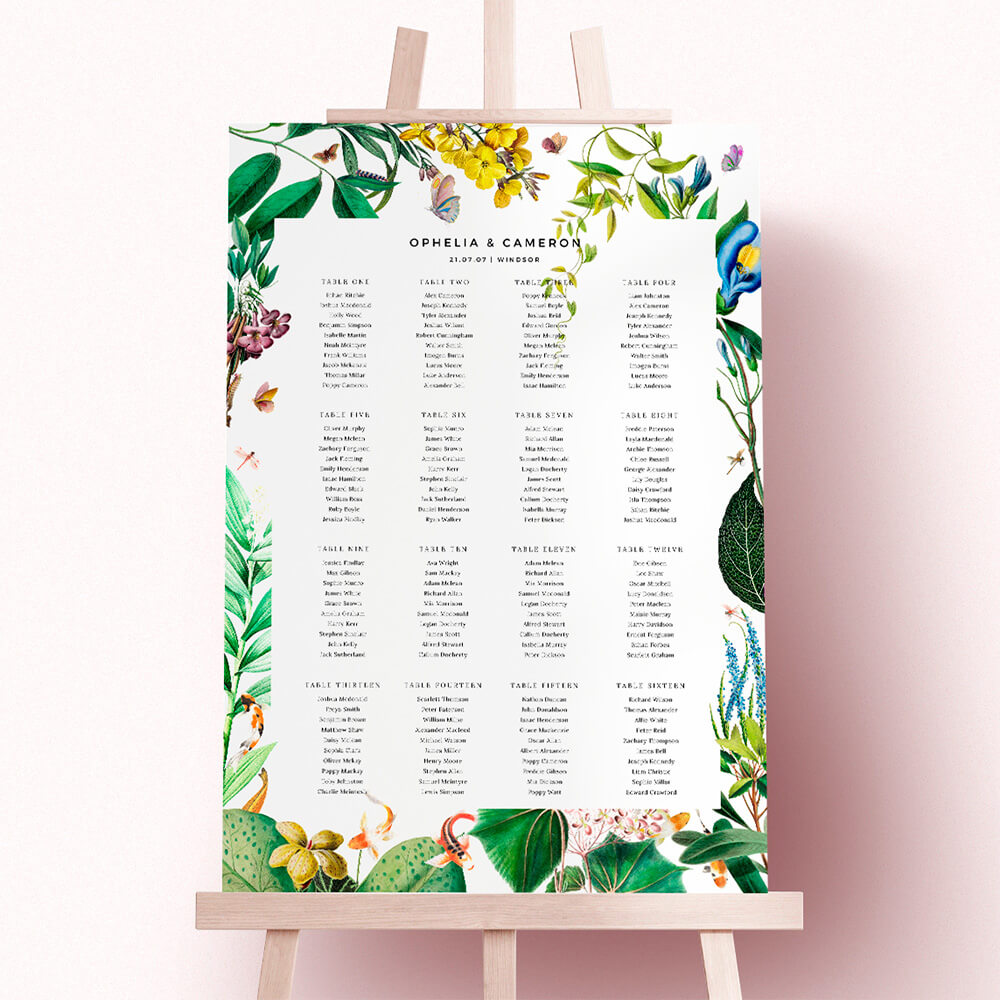
What to Put on a Wedding Table Plan: Names, Titles & Layout Best Practice
A wedding seating chart does a simple but vital job: it gets every guest to the right table quickly and calmly. If you’re wondering exactly what should appear on the board—and how to format it for a polished, etiquette-aware finish—this guide sets out the essentials, plus layout tips that work beautifully with Utterly Printable’s templates.
The user selects the number of tables in an online seating plan editor to define the layout.
1) What belongs on your seating chart (and what doesn’t)
A clear, concise table plan keeps arrivals moving and spares guests from awkward searching. Use the checklist below as your starting point.
Include:
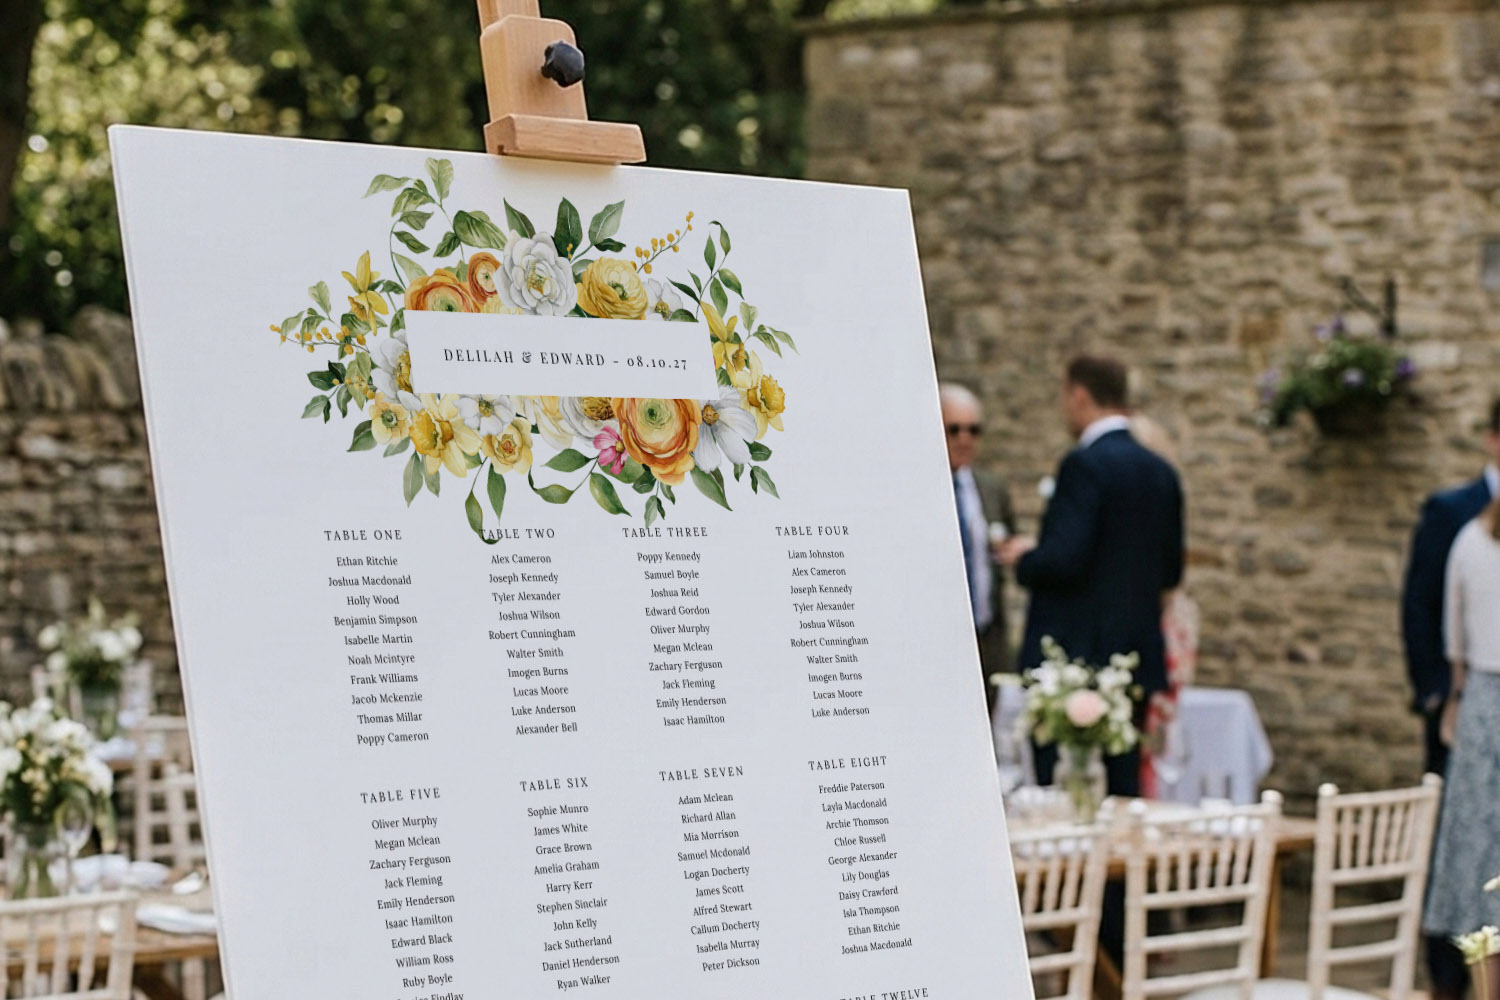
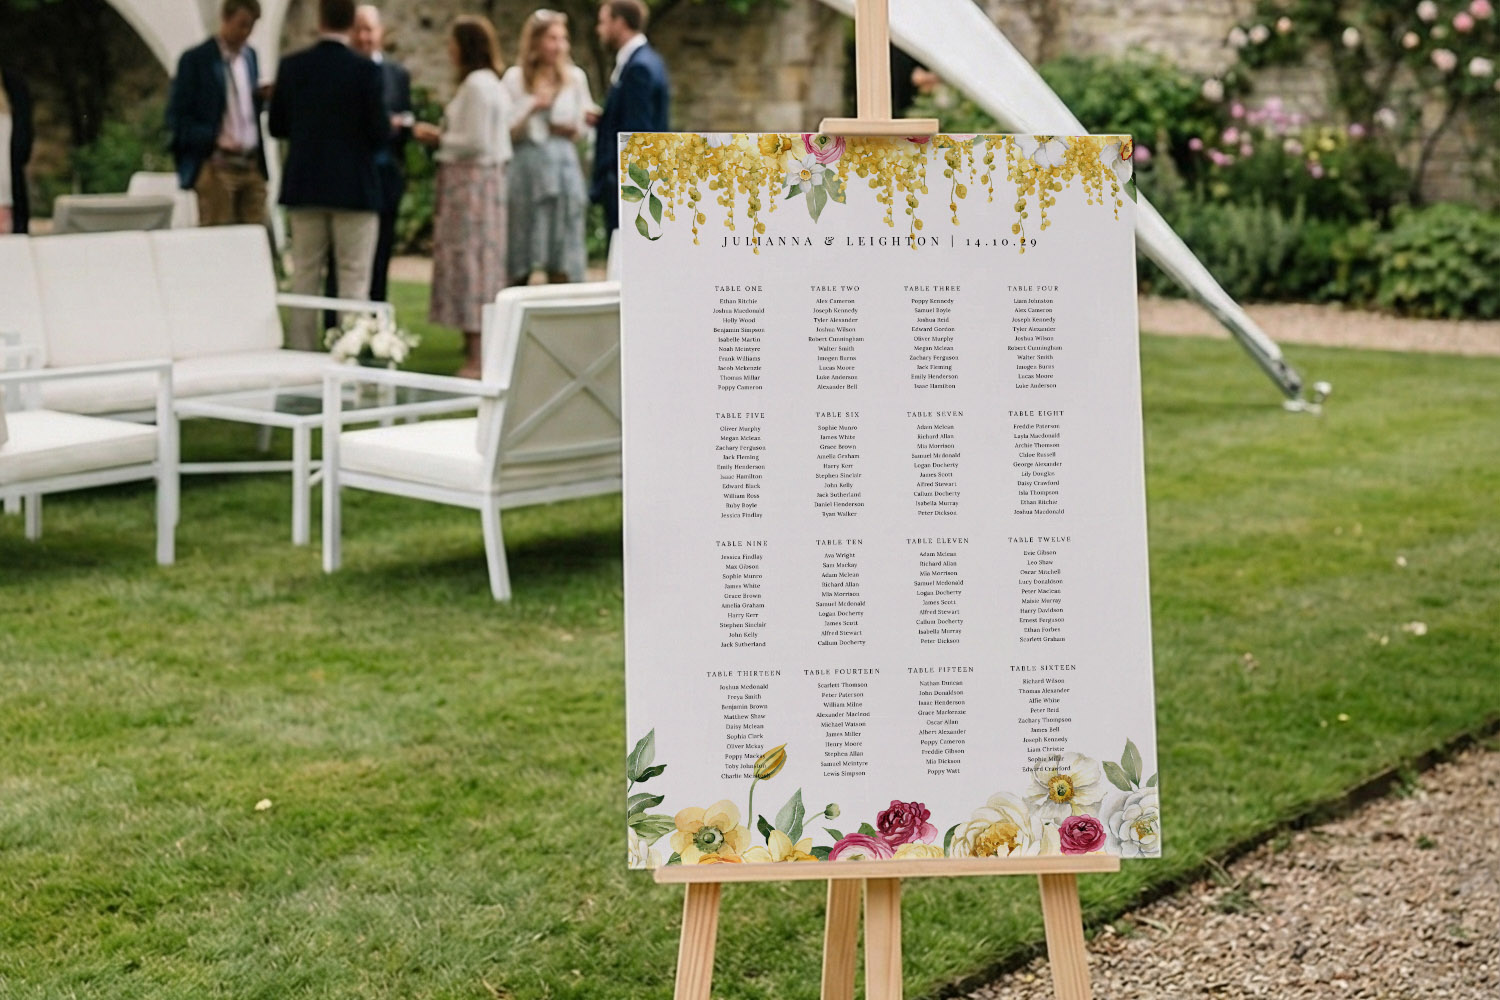
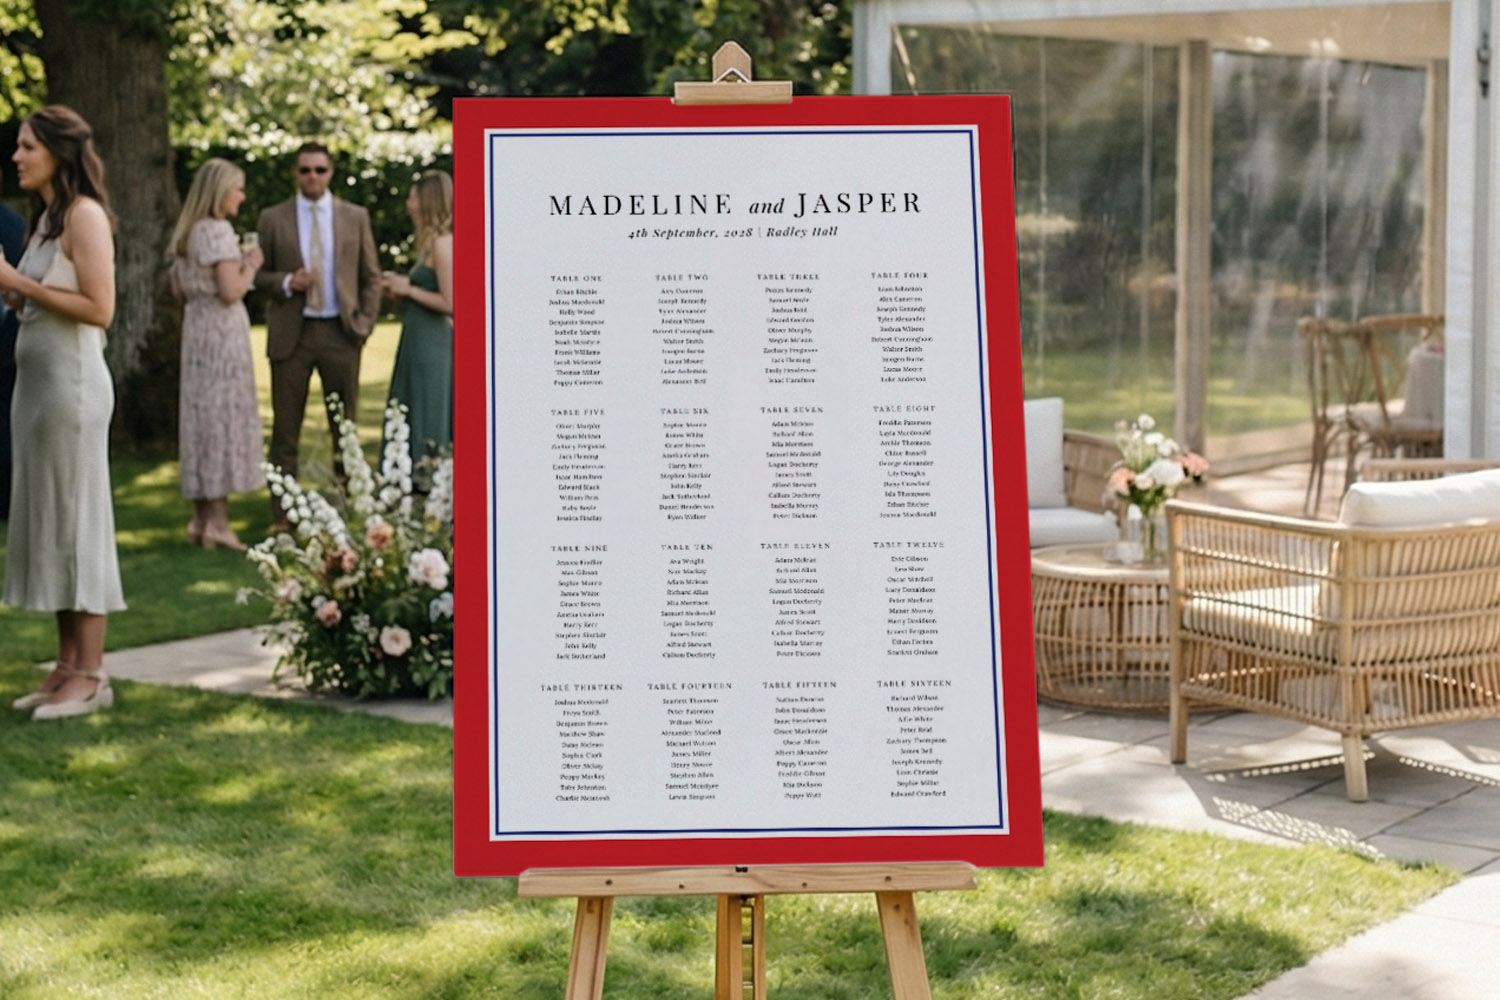
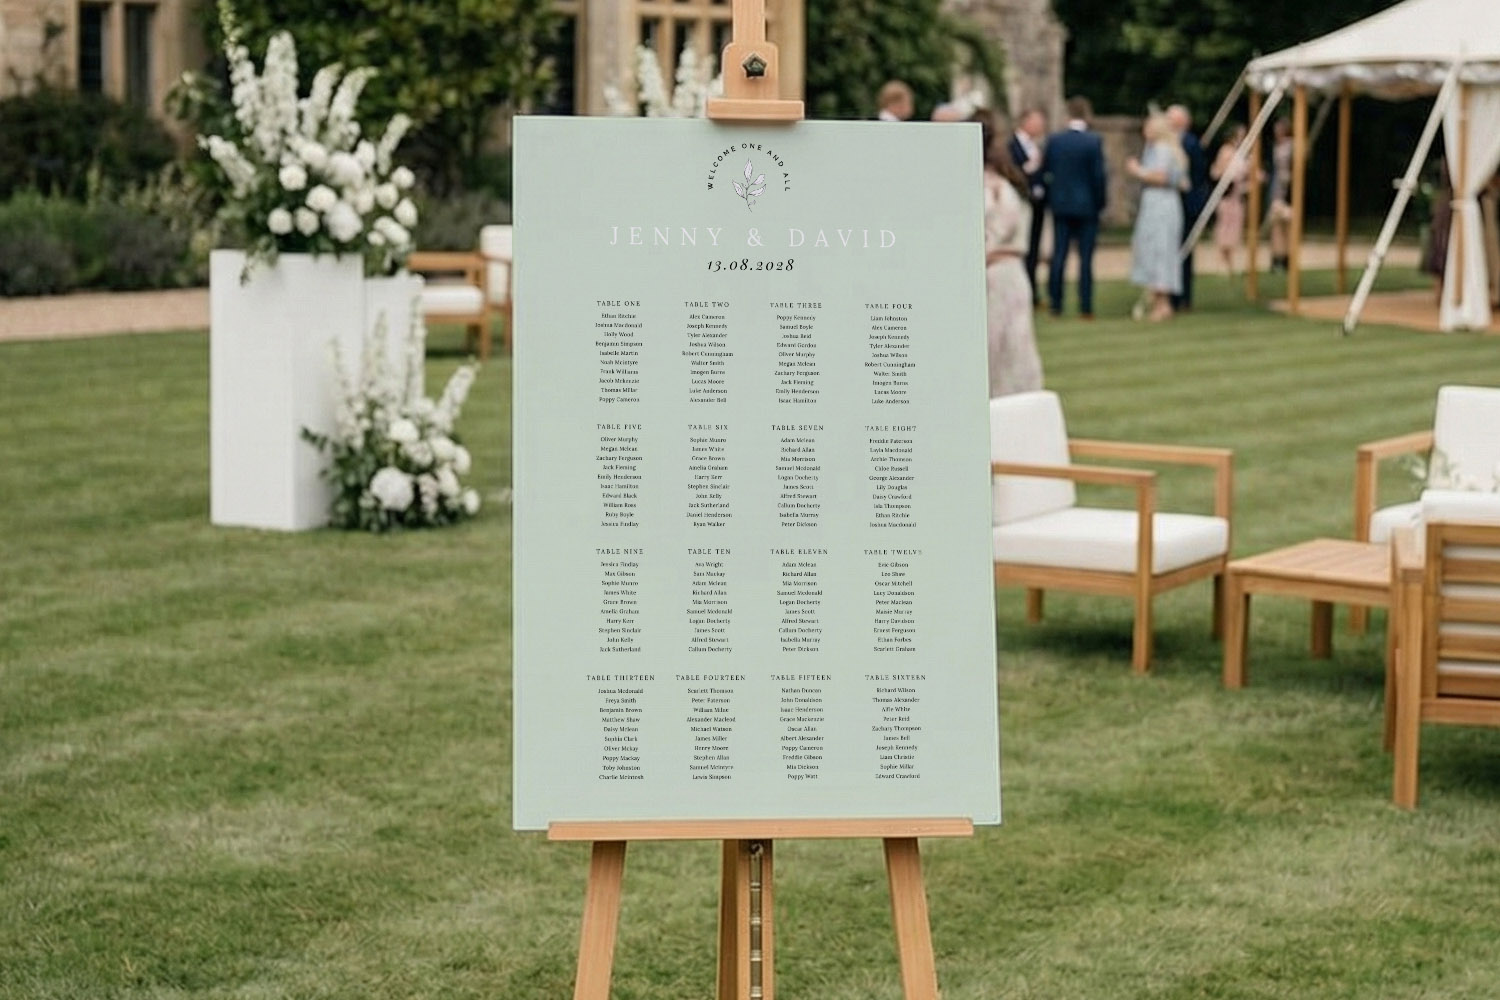
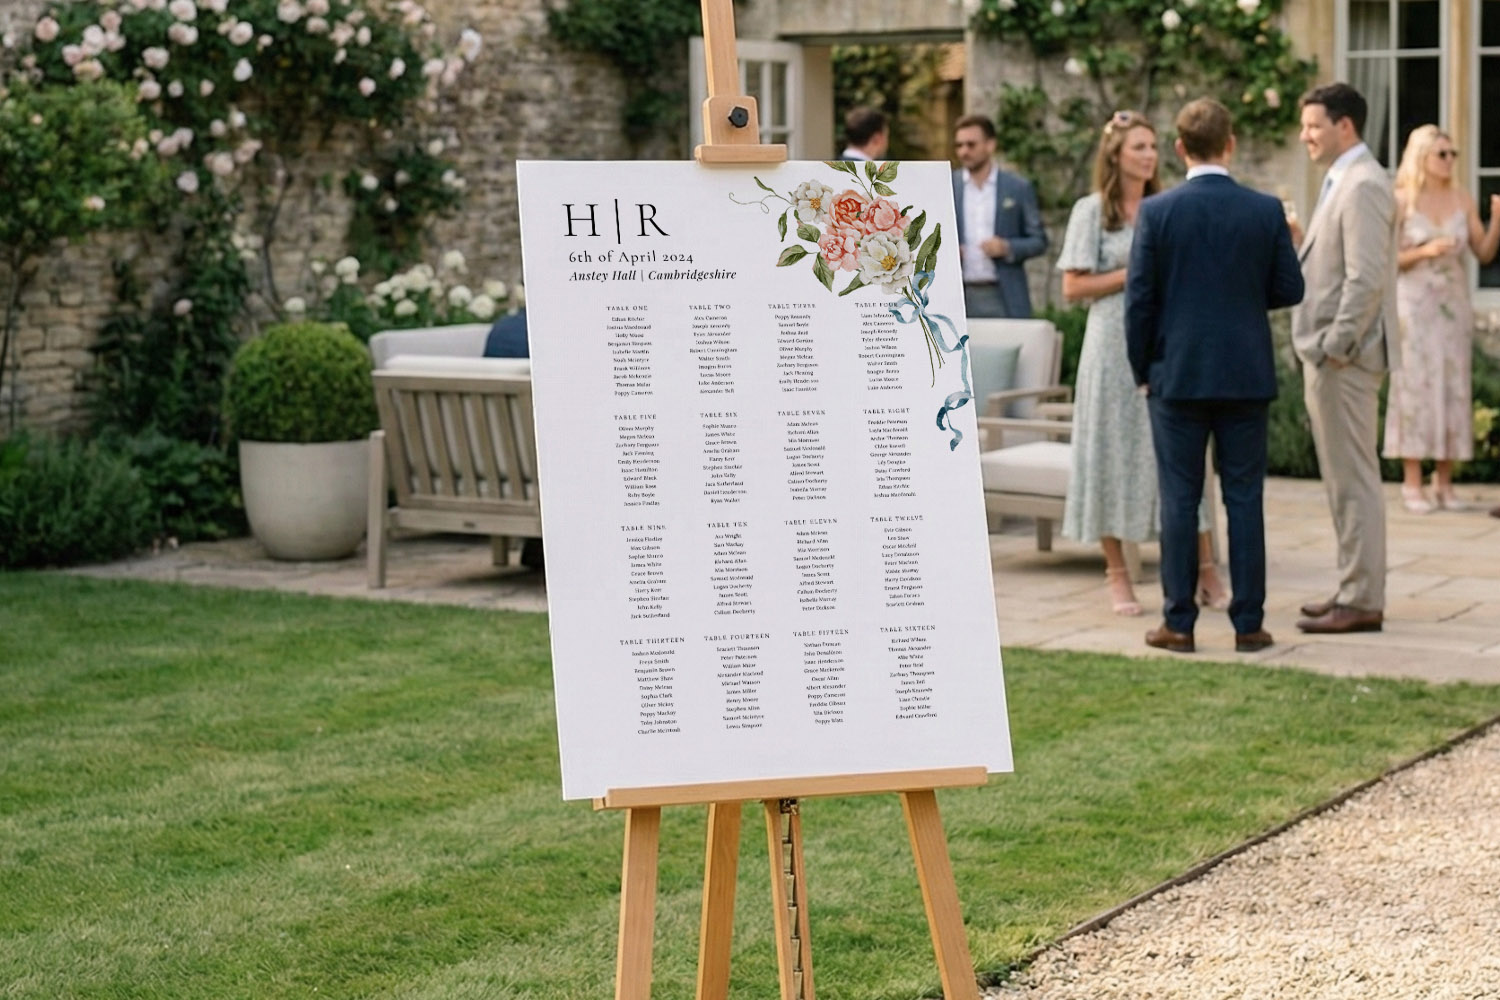
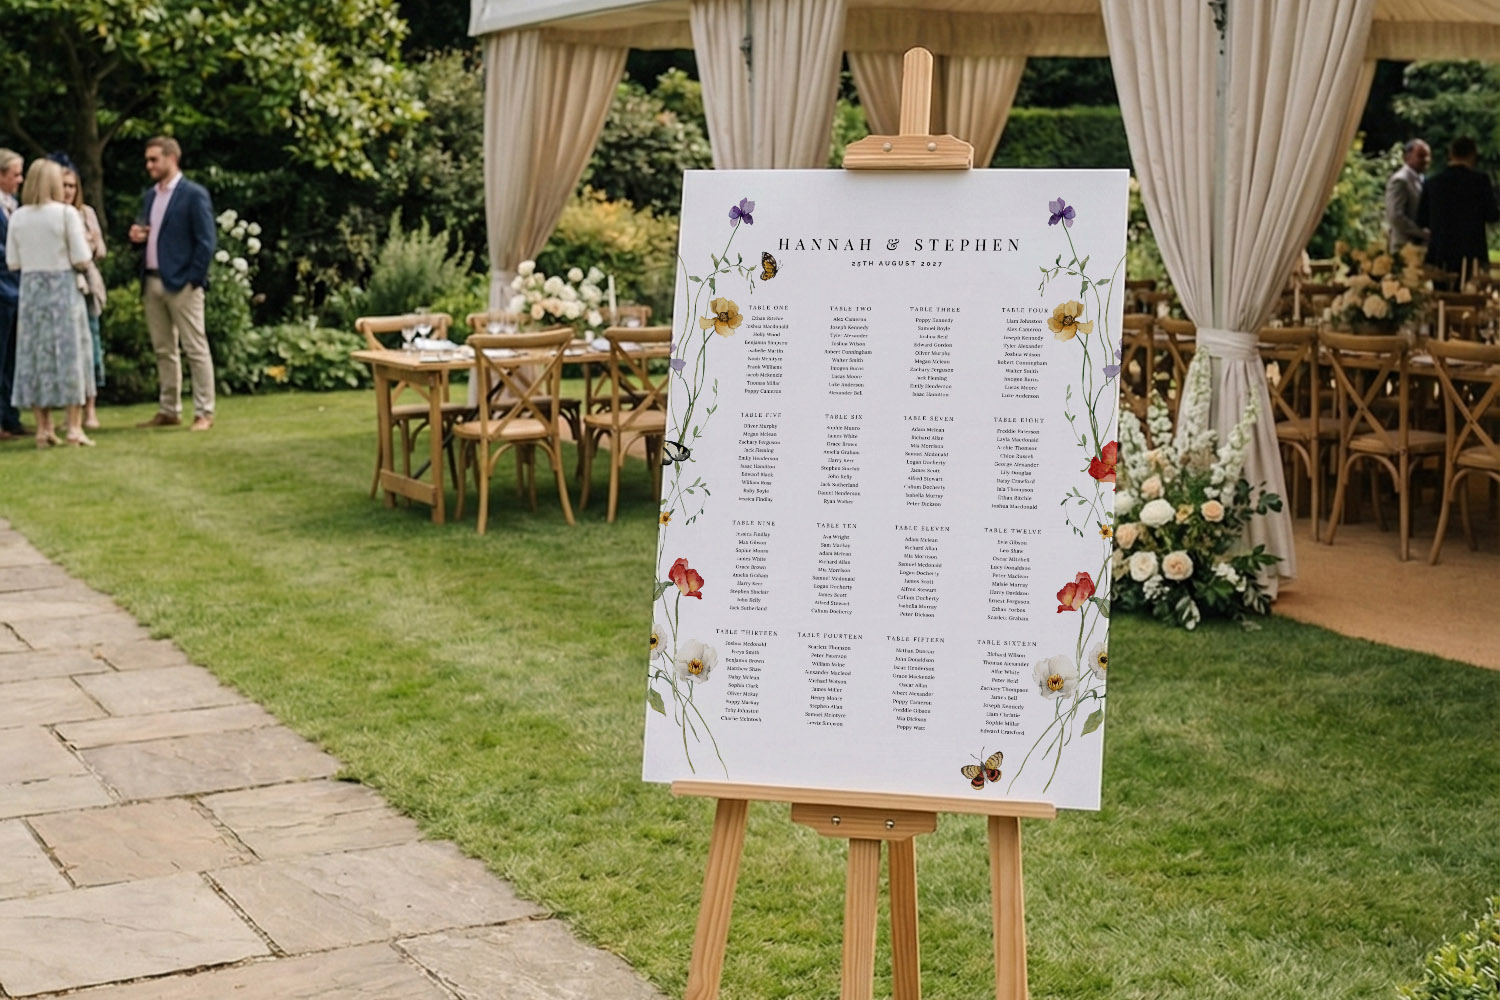
- Heading: Couple’s names (in your preferred order), wedding date, and optionally the venue.
- A simple instruction line (optional): “Please find your table”.
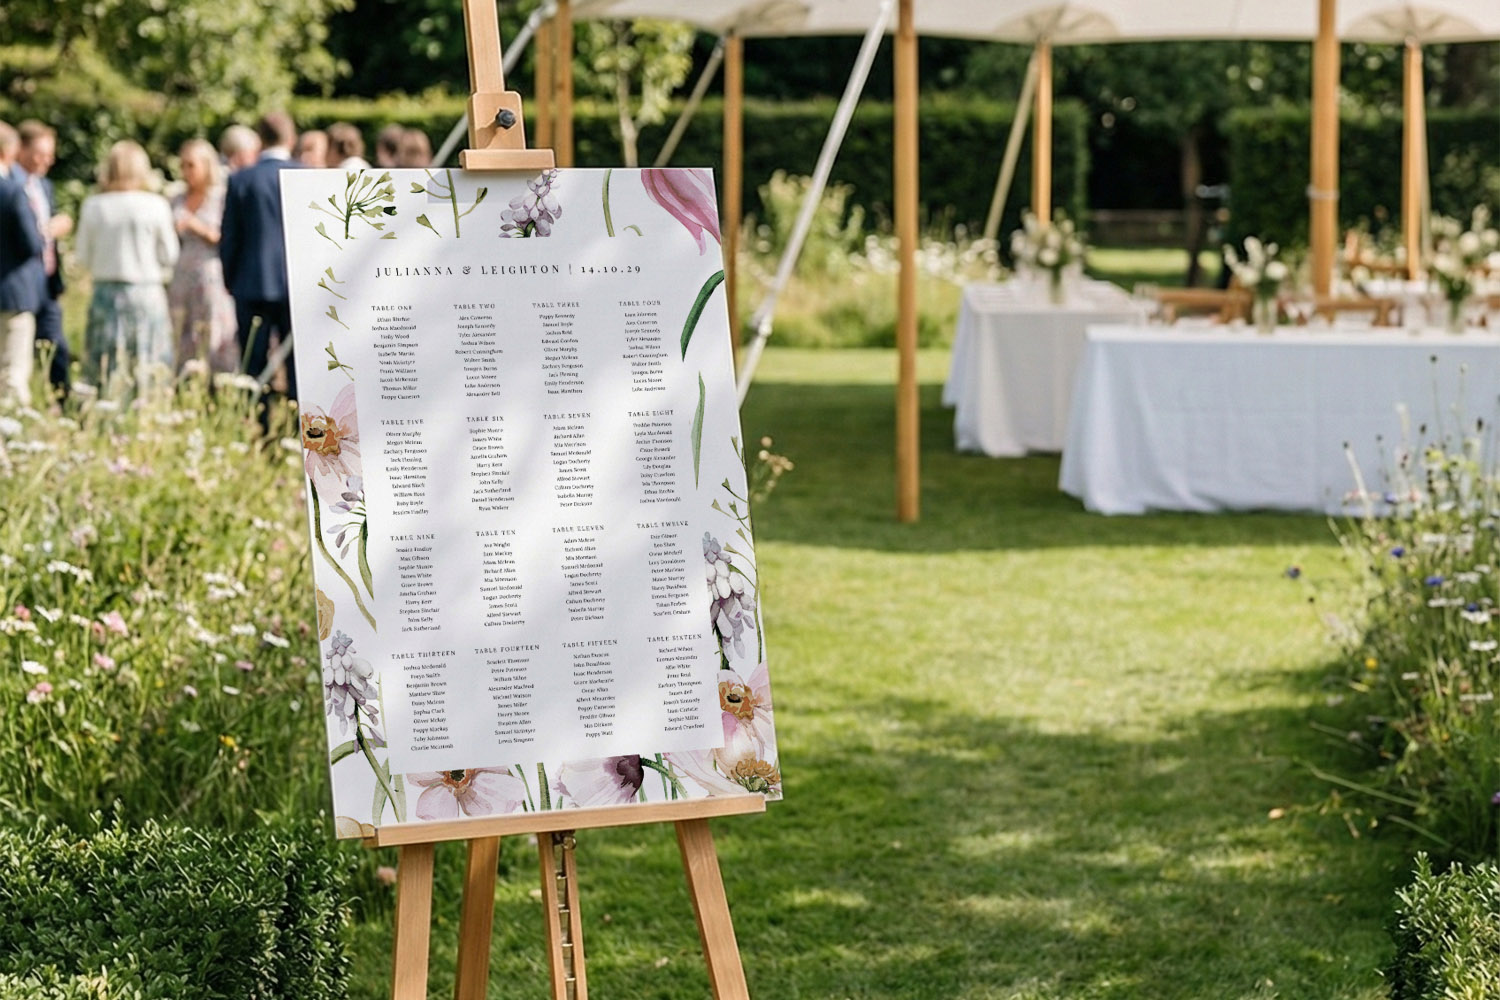
- Table identifiers: Numbers (Table 1, 2, 3…) or named themes (e.g. cities, flowers, favourite books).
- Guest names under each table: Consistently formatted (see Section 2).
- A small footer message or hashtag (optional): e.g. a welcome note or your wedding hashtag.
- QR code (optional): Handy if you’re pointing guests to a digital menu or wedding website, space allowing.
Avoid:
- Seat numbers or place allocations on the plan itself (that’s what place cards are for).
- Long paragraphs (toasts, schedules, or speeches—use a separate sign if needed).
- Meal choices (they add clutter and are better managed with place cards or your caterer’s list).
If you plan to design online, you can create and personalise everything above in our real-time editor: explore personalised wedding table plans. You’ll also find inspiration across all table plan styles, including floral table plan designs and rustic table plan boards, so you can co-ordinate the seating chart with your wider stationery and your wedding invitation templates.
This videos shows you how to easily edit table names on your wedding table plan.
2) Formatting names, titles and special cases
Consistency is king. Decide on one approach and apply it throughout.
First names vs full names
- Relaxed or intimate weddings: First names usually suffice (“Amelia Brown” can become “Amelia” if no two Amelias appear on the same table).
- Formal weddings or large guest lists: Use full names for clarity: “Amelia Brown”. If you have duplicates, add a middle initial (“Amelia J. Brown”) or distinguish using family relationships (“Amelia (bride’s sister)”).
Titles (Mr, Mrs, Mx, Dr)
- Optional for the plan. If you include titles, do it for all adults and use the correct forms: “Dr Priya Singh”; “Mx Jordan Taylor”. For married couples who share a surname, list them separately rather than as “Mr & Mrs”—it’s clearer for scanning.
Children’s names
- List children by first name under their allocated table. If you have several with the same name, add an initial or age (“Emily W.” or “Emily (8)”). Keep it discrete and consistent. Avoid diminutives unless requested by the family.
Couples, families and plus-ones
- Couples: Write each person on a new line. Grouping them helps, but avoid symbols (“&”) to keep scanning easy.
- Families: If you’re tight on space, you may place siblings consecutively, but still write one name per line.
- Plus-ones: If you know the name, use it. If not, “Guest of [Name]” is acceptable; update the plan if details are confirmed before print.
Diacritics, hyphenated surnames and nicknames
- Use the person’s preferred spelling and accents—Anaïs, José, Zoë. Hyphenated surnames stay intact (e.g., “Jamie Evans-Clark”). If a guest is known only by a nickname to most attendees, that’s fine—clarity beats strict formality.
Alphabetical vs table-by-table listings
- Table-by-table is the traditional approach and works well for relaxed receptions.
- Alphabetical listings help at black-tie or corporate-style events: guests scan for their name, then see the table number beside it. If you choose this route, keep columns tidy and ensure the table reference is bold or clearly differentiated.
The user selects and drags guest name text to rearrange seating positions within a wedding table plan design.
3) Layout best practice with Utterly Printable templates
Getting the content right is half the job; the other half is a crisp layout that reads at a glance.
Numbers or named tables?
Both work well—choose what fits your tone. If you’re opting for themes, multi-word titles (e.g., “Notting Hill”, “The Secret Garden”) are easy to enter in our editor and will display as typed. When scanning, shorter table names are quicker to spot, so avoid very long phrases unless you have ample space.
Handling long names and line breaks
Long names will naturally wrap within the text areas of your chosen template. Use the live preview to check line breaks, avoid orphaned words, and balance columns. If a list feels cramped, switch to a layout with more columns, flip to landscape, or size up from A2 to A1 for extra legibility.
Choosing a size and orientation
- A1 (594 × 841 mm): Ideal for larger guest lists or wide layouts.
- A2 (420 × 594 mm): Great for intimate receptions or cosy displays.
Portrait is sleek and classic; landscape often suits longer table names or when you prefer three or four narrow columns.
Make it scannable
- Keep consistent column widths and similar numbers of tables per column.
- Start each table with a clear label (“Table 4” or “Barcelona”).
- Use regular sentence case for names (ALL CAPS slows reading).
- Leave breathing space between tables; busy gaps make scanning harder.
- Position the plan near the entrance to the dining area to prevent bottlenecks.
Style, cohesion and where to browse
For a decorative focal point that still performs, match your plan to the rest of your suite. Explore floral table plan designs for garden venues, opt for rustic table plan boards for barns and tipis, or browse all table plan styles to find a modern or minimalist look that complements your wedding invitation templates.
What Utterly Printable offers (quick facts)
Utterly Printable’s seating charts are printed on rigid 5 mm waterproof foamex in A1 or A2, with eighteen prebuilt layout formats and real-time online personalisation. The boards are lightweight, scuff-resistant and ideal on an easel; production takes three working days with tracked courier delivery across the UK, and there’s also a high-resolution PDF download option if you’re printing elsewhere.
Good to know before you sign off
- You can edit designs in your account until printing begins; changes aren’t possible once production starts.
- No printed proofs are offered for table plans, so triple-check spellings.
- Foiling and framing aren’t offered on this product.
- Courier delivery is UK-only; consider the downloadable PDF for overseas events.
- There’s an optional carbon-offset at checkout.
Wedding Table Plan FAQs
A few key points to get you going right away.
For informal, midsized weddings, first names are fine. For formal events or large guest lists, use full names to avoid confusion; add a middle initial if needed.
Not required. If you do include them, apply titles consistently across all adult names and use the correct form (e.g., Dr, Mx). Avoid mixing titled and non-titled entries.
List children by first name beneath their allocated table. Add an initial or age only to distinguish duplicates—keep it discreet and consistent.
Table-by-table is familiar and friendly; alphabetical shines when you have 150+ guests or a black-tie feel. Choose one style and lay it out cleanly with strong table references.
Place it right before the dining entrance or just inside the room, with space for a small crowd to gather. An easel at eye level improves legibility.
A1 vs A2: choosing the right size for your wedding table plan
Deciding between A1 and A2 for your wedding table plan depends on your guest list, venue, and style. This guide explores each size’s advantages and drawbacks to help you design a practical, visually appealing seating chart.
Common Wedding Seating Plan Mistakes (and How to Avoid Them)
Creating your wedding seating plan can be challenging, but steering clear of common mistakes makes it easier. Explore helpful tips on design, layout, and printing to ensure your wedding table plan is clear, accessible, and stress-free.
Designing a Table Plan for Small vs Large Weddings (Layout Differences Explained)
Learn how to create the ideal wedding table plan for any guest list size. Explore layout options, board sizes, and practical tips to design a clear, stylish seating chart that ensures your celebration runs smoothly and looks beautiful.
Displaying Your Wedding Table Plan at the Venue (Easels, Walls & Outdoor Setups)
Explore creative ways to display your wedding table plan, from easels to outdoor setups. Get helpful advice on using foamex boards, choosing the best placement, and styling your seating chart to make it clear and inviting for guests.
How to Design an Easy-to-Read Wedding Table Plan (Typography, Spacing & Colour)
Discover how to design an easy-to-read wedding table plan with practical tips on typography, spacing, colour, and layout. This guide helps you create a seating chart that’s both beautiful and legible for guests in any venue setting.
Waterproof Wedding Table Plans Explained for Outdoor & Barn Venues
Discover how waterproof wedding table plans made from foamex keep your seating chart looking smart and legible at outdoor, barn, garden, or marquee venues. Learn why these durable boards are ideal for unpredictable UK weather and easy guest navigation.
When to Print Your Wedding Table Plan (and handle last-minute RSVPs)
Discover the ideal timing for printing your wedding table plan and how to manage last-minute RSVPs. This guide covers when to order, how to finalize your guest list, and tips for handling changes to ensure a seamless celebration.
Products related to table arrangements


Dive Into Our Blog
Wedding table plans are essential for guiding your guests. Check out the blog for advice on layout designs, customisation options, and practical tips for seamless seating arrangements.